A timeline is the central hub for your project and the core of how Tapwater operates. There are no rules about how to organize your timelines; it’s completely up to you. You may create a timeline for each project, or create one timeline per client if you have short-term projects but a long-term relationship.
When you log in, you will be presented with an index of all timelines on which you are participating.

To create a timeline, click the New Timeline button in the upper left.

You will then have the opportunity to name your timeline and adjust a few settings. Picking a color is a good way to make a timeline easily distinguishable from your other projects. Visibility controls whether or not the timeline can be viewed publicly on the Internet. Click Create Timeline to finish the process and open the timeline.

All of these settings may be changed later by clicking the Settings button at the top right-hand side of the timeline.

Hovering a timeline on the index page gives you quick access to common actions: you can create a new post on that timeline, share the timeline with others, or change timeline settings. You can also archive or delete a timeline from the index page.

When you're done with a project, you can archive it by clicking the three dots at the top right-hand side of the timeline and selecting Archive. Selecting Delete will permanently delete the timeline and everything posted to it.

You can see archived timelines by selecting Archived Timelines from the user menu in the top right-hand corner of your screen.


After creating a timeline, you may invite others to participate. To do so, click Share at the top right-hand side of the timeline.
This will open a dialog showing everyone participating on the timeline. You are the only one participating by default. To add someone, enter their email address. If the person you are adding already has a Tapwater account, you will see this:

Otherwise, you will see this:

Select a permission level for this person to the right-hand side of the field. The permission level determines which actions a participant may perform on this particular timeline.

Press Enter or click Invite to continue. Repeat this process to continue queueing up more participants. If a participant does not already have a Tapwater account, you must assign them a name. When you are done, click Add to Timeline. This will add the participants to your timeline and send out invitation emails.

Note that if a timeline's visibility is set to Public, then you may simply provide the URL of the timeline to someone you wish to read it. However, if the timeline's visibility is set to Private, then you must add a participant at permission level Spectator or higher in order for them to access your timeline.

Timeline members will be able to see your timeline on their index page when they log in. Note that when you invite teammates that are not already on Tapwater, signing up for an account is optional. They will still receive email updates whenever you make a new post. This is useful for clients that are hesitant to sign up for a new service.
Beneath the invitation section, you can see all participants and change their permission levels. Click Remove to revoke their access to your timeline. Note that if the timeline's visibility is set to Public, they will still be able to read your timeline's content by revisiting the timeline's URL.

You may leave a timeline by clicking Leave beneath your name. You may only leave timelines to which you were invited, not timelines that you created.
Posts are the content that make up a timeline. Any decisions or information that you want to share with your timeline participants is appropriate for a post, like meeting notes, artwork, deadlines, or important files. Posts have a date associated with them so that they can be displayed chronologically. Posts are best used to document the past and show evolution, so when your project changes course create a new post on today's date that indicates what changed and why rather than going to the past to edit the previous direction.
Click Create a New Post at the top of a timeline to start a draft.

You will be presented with the post editor for the draft that you just created. The content of your post is like a free-form document; you may add text, images, links, and attach files. Various formatting tools are available at the top of the editor to modify text appearance and create lists.

Shortcuts to important links and attached files may be added to each post to keep them right at hand when scrolling through the timeline.
These shortcuts are enabled by default for all links and attached files. To change this setting, while composing a draft, toggle the checkbox titled Show in Post Summary while a link or attached file is selected.


You may exit the draft editor at any time. Drafts are automatically saved so your work will not be lost. Your drafts may be seen from the timeline page underneath the Create a New Post button. Click on one to continue editing.

You must enter a title and date before a draft can be published. To assign an earlier date to this draft, pick one from the date picker at the top.

No one can see your drafts but you. To place your draft into the timeline for all to see, click Publish in the top right corner.

Publishing will take you back to the timeline. All posts are organized chronologically with the most recent posts up top. If someone else publishes a post, you will see a dot indicating that you have not yet read the content of this post.

A notification will also appear in your updates dropdown.

If you need to change the content, title, or date of a post, navigate to the timeline, click on the three dots in the right-hand corner of the post, and select Edit. This will open the draft editor. Your changes will not be visible until this new draft is published.

Deleting a post may be accomplished by opening the same menu and selecting Delete.
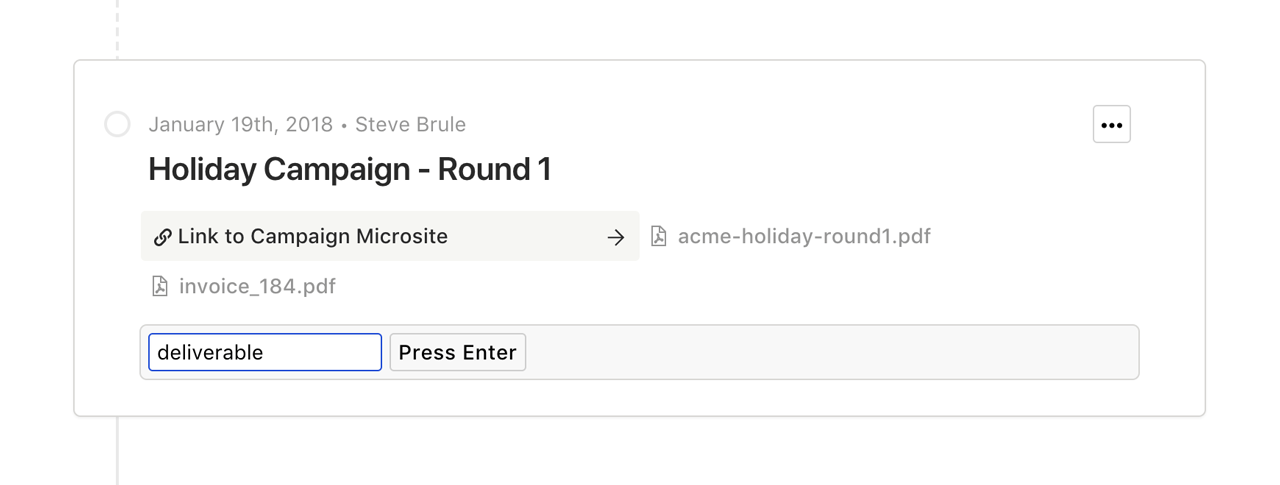
Posts are ordered chronologically, but if you need to view an organized subset of your posts, it is possible to add and view posts by tag. To add a tag, hover your cursor over a post in the timeline and click the Tag button in the top right-hand corner. This will enable tag-edit mode.

Enter a tag name (e.g. "deliverable") in the text field that appeared and press Enter on your keyboard to confirm. The tag has now been added. Click the tag to open the color picker and choose a new color if desired. Click the ⨉ button to the right of the tag name to remove it from this post. Click the Done button when you are done adding tags.

You may repeat this process on another post. Adding a tag that you have added to the first post will be auto-completed as you type.
Tags will be visible on the post as you scroll through the timeline.

Clicking a tag will open a view of the timeline that includes only posts with the specified tag. More tags may be added to the filter by typing them in the bar at the top left-hand side of the screen.

Sometimes, such as when presenting work to a client, you will want to collect feedback or get more details about an aspect of your project. Each post on a timeline contains its own thread of comments.
To add a comment to a post, click on the post and scroll to the bottom of the Post page, past the content of the post. There you will be able to enter a comment. Click Submit to send your comment. Note the tools in the lower right-hand corner to add links and format text.

By leaving a comment, everyone following the post will receive an email notification. To determine if you are following a post, look for the button above the comments section. Click it to toggle whether or not you are following the post.

If you've published a post, you will automatically be following that post. Members who leave a comment on a post will automatically start following it.
New comments will be indicated in the updates dropdown at the top right-hand corner of your screen. Like new posts, a dot will indicate if a particular post has comments that you have not yet read.

Generally, a user must create a Tapwater account in order to leave a comment. However, adding a participant that does not yet have a Tapwater account to a timeline will allow them to reply to notification emails about new posts via their email client. These email replies will automatically be added as new comments and indicated with an icon.

The updates dropdown at the top right-hand corner of your screen indicated by a water drop will turn blue when you have unread notifications. You will receive a notification when invited to someone else's timeline, a new post is published on a timeline on which you are participating, or a new comment is published on a post that you follow.

The timelines index also indicates you visually of these things with a colored dot.

Within the timeline, a post visually indicates that you have not yet read its content or that a new comment has been added with a colored dot.

All of the events mentioned above will trigger an email notification to the email address associated with your Tapwater account. You may change this by clicking the user menu in the top right-hand corner of your screen and clicking Settings.

From there, navigate to the Notifications tab and toggle the checkbox to indicate your preference.

All account and profile settings can be found by clicking the Settings option in the top right-hand corner of your screen. Here, you can update your information: name, password, or email address.

Need more timelines or larger file uploads? It’s time to upgrade. You can upgrade to the Pro plan by clicking the Subscription tab found in Account Settings. Enter your credit card information and any discount code you have (try using the code ALWAYSREADTHEDOCS) and click subscribe. Now enjoy unlimited timelines and 250MB uploads!

You can permanently delete your account from the Account tab. Enter your current password and click Delete Account. Note that all your user data will be permanently deleted, including timelines, posts, comments, and attached files. Any posts or comments you’ve made on timelines owned by someone else will not be deleted. If you're subscribed to the Pro plan, you'll have to cancel your subscription and wait until your current billing period passes before your account can be deleted.
